Wednesday, March 31, 2010

Custom Headboard with Decorative Hardware


This headboard design began with a simple idea, how can you use decorative window hardware in a new way.  The inspiration for this design came from looking at decorative hardware vertically instead of the usual horizontal, over-a-window fashion.

The project began with a sketch and a consultation with Amy Johnson with Finestra Decorative Hardware .  She helped to choose an appropriate finial and suggested a 3" pole rod which was then cut in half for two "poles" that would attach to the headboard.  A slight cutout was made to the back the finials and then the rods were hand painted.  The "Tusk" finish was chosen for a lighter, more casual match to the textured, linen look material.


This headboard was build using FirmaFlex from Rowley Company .  FirmaFlex is a rigid fiber board that is light weight and easier to work with than plywood.  A frame on the back helps to reinforce the board.


Foam and Upholstery Batting were added to the three sections leaving the area for the pole rods flat.  After upholstery the pole rods were secured from the back of the headboard with wood screws.  The back was covered with lining and gimp braid to cover all staples for a neat finish.


The headboard was installed on the wall using the Headboard Cleat from Rowley Company.  Wall mounted headboards allow for easy installation and the bed can be moved for cleaning without a headboard attached to the frame.


The finished headboard is a one-of-a-kind, custom creation.  Consider incorporating decorative hardware into your bedding designs by adding finials to headboards or using medallions and pole rods for a dramatic bed drapery.


To learn how to make the headboard shown here and more join Rowley Company for the upcoming webinar "Upholstered Headboards" on April 23rd at 11:00am EST.  To register visit www.RowleyCompany.com and click on "webinars" at the bottom of the home page.

Wednesday, March 17, 2010

Roman Shade with Scalloped Hem


This pretty shade features a scalloped bottom edge with trim.  

The shaped hem was made using the Rowley Company Fusible Stabilizer on the materials before it was sewn and cut.  After the scalloped shape was turned right sides out a piece of Iron-On Adhesive Web, cut in the same shape, was placed inside and it was all ironed to give a crisp finish that still has a soft appearance.  The finished scalloped edge is sewn together with the face fabric, trim and lining at the bottom.


After ironing the front and back the side hems are turned in along each side.


A tuck or pocket is sewn to the reverse side for the weight bar.  


The Rowley Company Iron-On Rib tape was used with Iron-On Adhesive Web under the lining to hold it all together at each row of rib tape.  After inserting the plastic ribs the side hems are finished.  Encased lift cord shroud tape is sewn in columns across the back of the shade.  The tape can be tacked above or below the iron on rib tape.  A shade ring is sewn at the bottom of the shade and the cord tied to this ring or a cord adjusting orb can be used.  At the top of the shade the cord will exit the tape is thread into the lift system.


The EZ-Rig Shade Lift System was used with the shade installed directly to the track with hook and loop tape.  The finished shade is bright, cheerful and ready to be installed.


Friday, March 12, 2010

Reverse Mount Shade using the EZ-Rig System

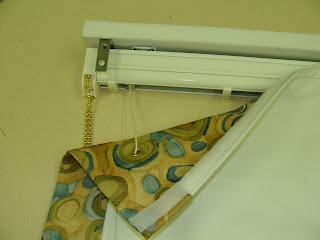
Reverse Mount shades are popular for window and doors because there is less space between the shade and the window glass.  The pictures below show how to mount to the reverse of the EZ-Rig Shade system. 

Loop strip is sewn to the top of the shade on the front and is then attached to the hook strip on the track of the system.


When fabricating small grommets will need to be added under the system to allow the lift cord to pass from the reverse side up into the drums.  Ceiling brackets are used under the valance mount board to attach the track.  Angle irons are used to attach the mount board to the window or door.


A valance is added to hide the system.


To see videos about the EZ-Rig Shade System visit www.RowleyCompany.com and click on "Video Solutions" at the bottom of the home page.

Monday, March 8, 2010

Grommet Embellishment


Grommets can be used as embellishments on window treatments or pillows.  This shade features square grommets over a padded suede inset.  The workroom must pre-plan the location of the grommets and set them prior to adding linings.  Buckram was added to the bottom of this shade to add structure for the grommets and allow the bottom to remain even.  


This shade also features the EZ-Rig Shade Lift System, Iron-On Rib Tape, Ribs and the EZ-Release Shade Ring System.  The shade operates easily and fabrication is made more efficient by using the iron-on products.

Friday, March 5, 2010

High Point WCAA Chapter Visits Rowley Company

Six members of the High Point Chapter of the Window Coverings Association of America visited Rowley Company on March 5, 2010 for a tour.  Pictured above (from left to right) Bill Taylor, CEO Rowley Company, Stacey Just, VP of Marketing, Rowley Company, Amy Gilbert, Window Works Studio, Bobbie Koriakin, Bobbie K. Designs,  Jannese Gerkin, Window Wear, Amy Meinecke, Window Works Studio, Gayle Eason, Gayles Custom Sewing for the Home, Donna Stanley, J.D. Stanley & Co. and Susan Schurz, Brand Experience Manager, Rowley Company.